Skylights are a fantastic addition to any home, bringing in natural light and making spaces feel larger and more inviting. Whether you have a flat or sloped roof, skylights can help brighten up your rooms, reduce the need for artificial lighting, and even help with energy efficiency. But knowing how to install skylights on a low-slope roof may seem tricky, but with the right planning and materials, you can enjoy all the benefits without worrying about leaks or other issues.
Skylights, especially in places like Vancouver, WA, can significantly reduce your reliance on electricity by allowing more daylight into your home. They can also help you get some fresh air if you choose a skylight that opens. The benefits are clear: more light, better ventilation, and a more pleasant living environment.
Planning for Skylight Installation on a Low-Slope Roof
Installing a skylight is a complex project that requires specific knowledge, tools, and adherence to local building codes. It’s strongly recommended to hire a professional roofer for this task. Incorrect installation can lead to water damage and other serious issues.
If you’re determined to tackle this project yourself, here’s a general overview of the steps involved:
Plan and Prepare
- Choose the right skylight for your roof pitch and load. Look for low-slope or flat roof skylights–or even roof access skylights as they are made for these types of roofs.
- Obtain necessary permits and inspections.
- Gather tools and materials, including roofing nails, flashing, caulk, and insulation.
Locate and Mark the Rafters
- Determine the optimal location for the skylight based on structural integrity and desired light.
- Use a stud finder to locate the rafters and mark their positions.
Create the Rough Opening
- Cut through the roof sheathing to create a rough opening for the skylight.
- Remove any existing insulation and roofing materials within the opening.
Install the Skylight Curb
- Construct a wooden curb around the opening to support the skylight.
- Ensure the curb is level and securely attached.
 Install the Skylight
- Carefully lower the skylight into the opening and secure it to the curb.
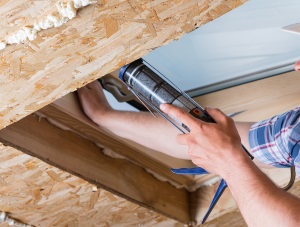
- Seal all gaps with caulk to prevent leaks.
Install Flashing
- Install flashing around the skylight to prevent water infiltration.
- This is a critical step and requires precise measurements and installation.
Restore Roofing
- Replace the roofing materials around the skylight, ensuring proper overlap and sealing.
- Install any necessary ventilation or insulation.
Check for Leaks
- After installation, inspect the skylight from inside and outside your home.
- Use a hose to spray water above and on the skylight. Look for any signs of water pooling or leaks.
- If you notice any issues, address them immediately to avoid further damage.
Interior Finishing
- Install interior trim or casing to finish the skylight installation.
- Connect any electrical wiring for lights or blinds.
Remember, this is a simplified overview. The actual process involves many more details and precautions. Improper installation can lead to severe water damage and structural issues.
Differences Between Installing a Skylight on a Low-Slope Roof vs. a Sloped Roof
Installing a skylight on a low-slope roof is different from installing one on a more common sloped roof. The biggest challenge with a low-slope roof is managing water. On a sloped roof, water naturally runs off, but on a low-slope roof, water pools can form, leading to potential leaks. That’s why it’s essential to use skylights for flat roofs that are designed to prevent leaks.
Another difference is the type of skylight you might choose. On a sloped roof, fixed skylights are often a good choice because they’re less likely to leak. However, on a low-slope roof, curb-mounted skylights are usually the best option because they help keep water out. You also need to take extra care with flashing and sealing on a low slope roof, as there’s less of a slope to naturally divert water.
Additionally, the installation process might require more reinforcement of the roof deck on a low-slope roof to ensure the skylight is secure and can handle any weight, including snow or debris.
Importance of Proper Skylight Installation
Proper skylight installation is critical, no matter the roof types you’re working with. If the skylight isn’t installed correctly, you could face serious issues like leaks, which can lead to water damage inside your home. This can be especially problematic on low-slope roofs, where rainwater collecting on top of the skylight can quickly lead to problems.
If water does get in, it can cause mold, rot, and structural damage, which can be expensive to fix. Plus, a poorly installed skylight might not be as energy-efficient, meaning you’ll lose some of the benefits you were hoping to gain. Always ensure the skylight is properly sealed and flashed to keep it leak-free and functioning as it should.
FAQs About Installing Skylights on Low-Slope Roofs
Can I install any skylight on a low-slope roof?
No, you should choose skylights for flat roofs that are designed for low-slope roofs.
What’s the best type of skylight for a low-slope roof?
Curb-mounted skylights are often the best choice for low-slope roofs because they help prevent water from pooling around the skylight. And we would recommend spending a little more on a quality skylight because they will last longer.
Do I need a professional to install a skylight on a low-slope roof?
If you’re not experienced with roofing, it’s a good idea to hire a professional to ensure the skylight is installed correctly and leak-free.
How long does skylight installation take?
Depending on the size and type of skylight, installation can take a few hours to a full day.
What should I do if my skylight leaks?
If you notice a leak, contact a professional immediately to inspect, repair, or replace the skylight. Ignoring leaks can lead to significant damage.
Installing a skylight on a low-slope roof can be a great way to bring more light into your home, but it’s not always easy. If you’re not sure you have the skills, tools, or time to do it yourself, don’t worry! Warner Roofing and Construction is here to help.
We have years of experience installing skylights on all kinds of roofs, and we can make sure your skylight is installed properly and leak-free. Reach out for a free estimate today, and let us brighten up your home with a beautiful, energy-efficient skylight.


